ProTypestyles

Showing posts with label Title Designer Technique. Show all posts

Wednesday, June 25, 2014

S4T Tip: Saving Custom Premiere Pro Title Templates (It's only weird the first time...)

 If you are a person having a difficult time figuring out how to save your own custom title template in Premiere Pro's Title Designer, you aren't alone.

To call the process 'unintuitive' is probably charitable, but once you understand the language and the odd interface design, it's actually extremely simple...there are, quite literally, 3 steps.
Figure 1 (click to enlarge)


Step 1 is illustrated on figure 1...find the 'Templates' icon and click on it.


Step 2 is laid out in figure 2.  You need to go to the top/right of the templates dialog and click on the unlabeled button, which opens the panel menu.


Figure 2 (click to enlarge)
Step 3 is to forget everything you know about the terminology used in every other part of Premiere Pro, because you won't see a 'save' option of any kind in that menu.  To store the title you're currently working on as a template that you can recall later, choose 'Import Current Title as Template'.  Yes, I know that importing something already in the project seems odd...even 'Export Current Title as Template' would make more sense if 'Save Template' is somehow unworkable..but there you have it.

For information on how to save S4T Free Templates to your library or where the templates are located on your system, download our docs on the topic here.

Wednesday, May 28, 2014

S4T 45 Free Typestyles: You choose the font, and we supply the rest

Style4Type 45 Free Typestyles (click to enlarge)
Some of you might look at our 45 Free typestyles and be concerned that you don't see a lot of type face variety.

Next to the original typestyle library that shipped with your software, the actual fonts that are visually represented are few in our 45 Free S4T Typestyles Library set.

The default typestyle library (click to enlarge)
Since versions of Premiere Pro since CS3 are available for Windows and Mac and those two systems have different fonts included with the system, and on top of that, each user can add fonts to their system over time, there isn't a good way to predict which compatible fonts are installed on each user's system.

For this reason, most S4T Typestyles (there are a few exceptions) are built around basic fonts like Arial or Times.  This makes the results for our users as predictable as possible.

4 different fonts using the Superbroadcaster 'style'  (click to enlarge)
Keep in mind that this presents no limitation for you, as the user.  You can simply type some text using an S4T Typestyle and then change the font to something you'd prefer from your system and keep the 'style' attributes.

You could also take an existing type object and simply apply a style without changing the font (use Alt/Opt).  The four type objects shown to the left all use the "Superbroadcaster' typestyle from the Free S4T Typestyle Library.

The Title Designer tool inside Premiere Pro continues to be an undiscovered gem for most users...at least most users who haven't yet discovered Style4Type.com.

Download 45 Free Style4Type Typestyles here...and check out the Premium Styles and Templates available for Premiere Pro while you're there.

Thursday, May 22, 2014

Free S4T Template PROJECT: News GFX

Background image for illustration only (click to enlarge)
We've built another project using the Title Designer to create a series of elements than combine them.

In this case we have a typical news network lower third with a variety of distracting elements all competing for your attention...just like the big guys do.

In this project you'll find separate elements that can each be altered by you with your own custom text and images...even change the color scheme if you'd like...it's all available in the Titler.  This project includes a series of layers: a background with the opaque color elements, a logo, and multiple text elements including a crawl moving across the bottom.  You can replace our text with your own...we just gave you something to start with.

Illustrated layer order (click to enlarge)
The project is saved as CS6, so the project will load in CS6 and later.  If you have an earlier version of Adobe Premiere Pro, each title is also saved separately inside the zip, and you can load them and use them in a variety of older versions.  Follow the layer stacking order we have in the illustration to reconstruct the entire graphic.

Download the project here.

Monday, May 5, 2014

Free S4T Template PROJECT: Energy Pulse

 Today's free template is actually a collection of titler files put together to accomplish an interesting effect using Premiere Pro's built-in effects...and the titler.

There are three separate files involved in this effect:

1. The main title itself,

2. A matte created by simply duplicating the main title file and making the text white and  turning off all strokes, and turning on a black background,

Figure A
3. A title file consisting of a large rectangle drawn inside the titler with a green/black gradient applied,

First, we created a sequence for the rectangle gradient file to animated left-right on top of a black layer (Figure A).  In this case, we stretched the graphic to create a longer "bright" state, but you can adjust this as you prefer.  We created key frames, one at the beginning with the green completely off-screen left, and one at the end with the green off-screen right.  The animated bright element is now complete.

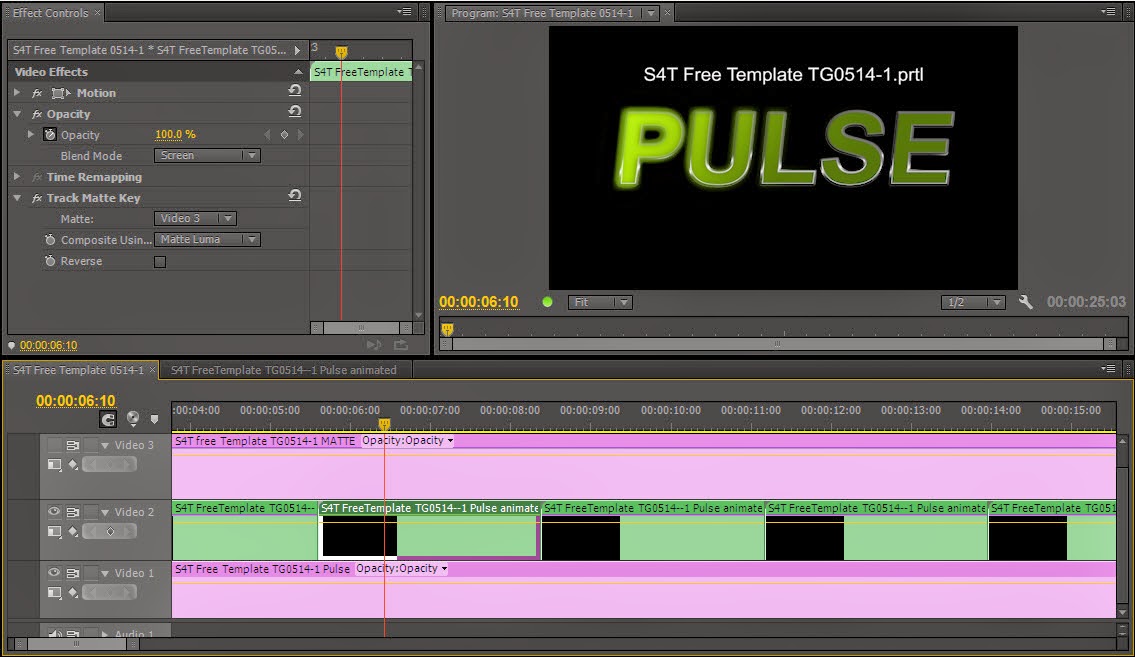
Second, we created another sequence and put the main title element on V1, we nested the pulse sequence we just completed on V2 (we repeated it several times as you can see in Figure B, but wait a bit before you create the duplicates if you're building this from scratch), and we placed the matte title on V3 and clicked on the "eye"-con to make V3 invisible.

Two last bits of business...we added a gaussian blur to the matte to make the edges of it soft and imply that sort of 'glow' you see in the finished effect.  We then added the Track Matte effect to the nested 'Pulse' sequence on V2 and set it to matte from V3 and composite using Luma.  We also enabled the screen key function in the opacity blend mode on the nested sequence.

Once the effect looks right, you can duplicate the nested sequence to create as many loops as you want.

This download is a zip file that contains the Premiere Pro project with all the settings for you to reverse-engineer yourself, as well as the individual title files.  If you have CS6 or later, you can use the project file.  If you have an earlier version, you can build the same effect by and loading the individual title files and following these instructions.

(*If you are using a version of Premiere Pro that pre-dates the ability to nest sequences, you would have to render the moving green element as a separate video clip and import it and use that in place of the nested sequence.)

Download the project and the files here.


Monday, February 24, 2014

S4T Tip: Using your Titles in other software

One thing that frustrates many Adobe users is that the text generators in Photoshop and After Effects, while useful, aren't as feature-rich as Adobe Premiere Pro's Title Designer.

The challenge with using the Title Designer as a text source for other software is that the proprietary text file is kept inside the Premiere Pro project, and when exported as a Title, the resulting .prtl file isn't readable by any other software program (Adobe or otherwise) outside of Premiere Pro.

However, the text (if not the Title file) can be used in other programs by utilizing a fairly simple export procedure.

Disclaimer: There are a wide variety of versions of Premiere Pro in use.  This process is verified in CS6 and CC.  In many earlier versions of Premiere Pro, a still image needs to be exported through the exporter dialog and settings chosen in the export dialog will affect the file settings.
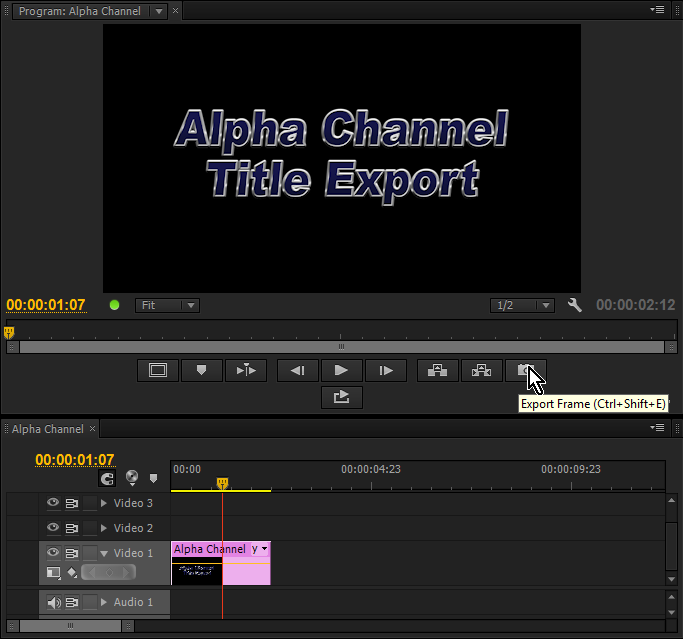

Fig. A  Premiere Pro Title Export  (click to enlarge)

1.  When you make a title with alpha channel transparency that you want to preserve, you must first place it into an edit sequence.


(Keep in mind that the frame dimensions of the sequence will be the frame dimensions of the file you export.  Creating the Title at the largest dimensions possible and placing it on a sequence of the same dimensions will preserve the most options for you later.)
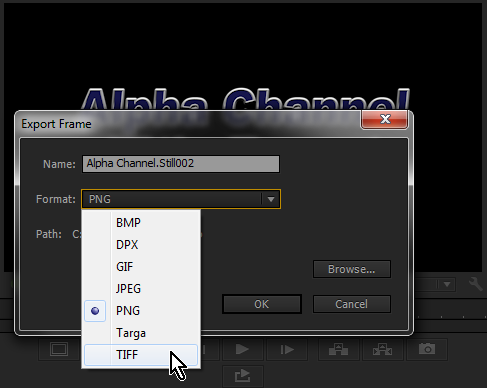

Fig. B  Premiere Pro's Export Frame dialog  (click to enlarge)
2.  After positioning the playhead in the sequence over the Title (as shown in Fig. A), you can use the "Export Frame" icon/button to bring up the Export Frame dialog (as shown in Fig. B).

*If you don't see the Export Frame icon or the transport controls, you can use the Settings icon (the wrench symbol), to access the menu where you can choose to "Show Transport Controls".


3. The Export Frame dialog has several options for export formats, some that can carry an alpha channel, and some (like JPEG) that do not.
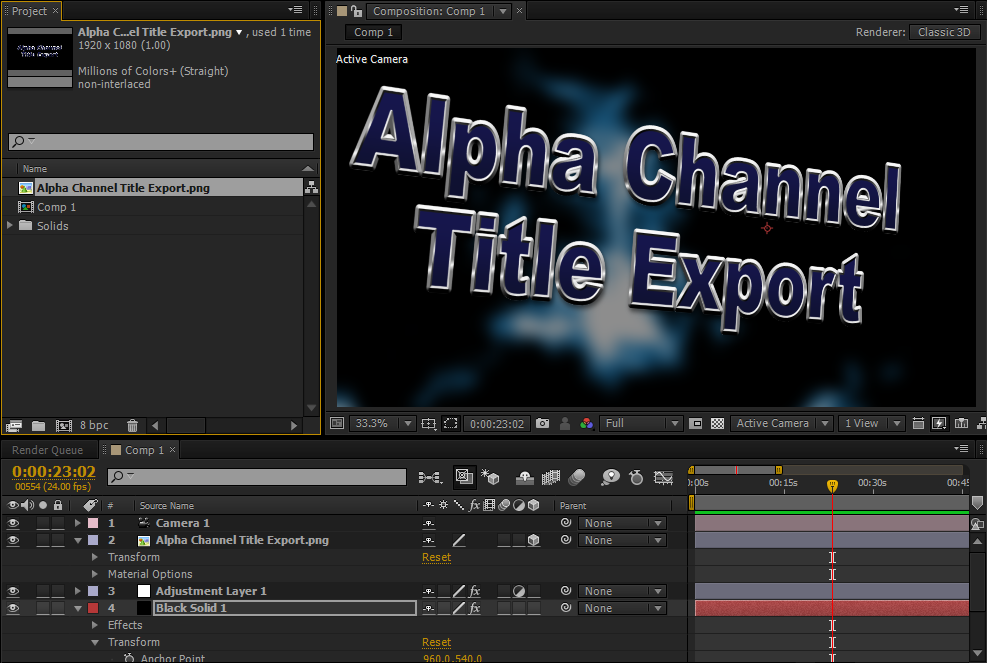
Fig C.  Exported Premiere Pro Title in After Effects  (click to enlarge)
The two alpha-capable file types that will maintain the widest compatibility with the widest variety of outside applications would be PNG and TIF.  (However every individual's workflow is different and it's possible your optimal choice may be different.)


4.  Loading the file into Photoshop will immediately show you the alpha transparency in the PNG and the TIF alpha channel will come in as a layer, though it won't immediately open showing classic Photoshop transparency.

Loading either file into After Effects (as shown in Fig. C) enables you to use the title as a composited element using the alpha channel transparency.

Obviously in this scenario, the text in the exported title document is not editable as the text generated in Photoshop or After Effects, so keeping the Premiere Pro project in case you need to return to the Title document and make a change will make your life easier as client revisions start to come in, and exporting the revised title to the same location and file name as the previous version will act as an "auto-replace" for an AE project that is pointed to the previous file's location.

Thursday, February 6, 2014

S4T Tip: Start your own typestyle library with a (nearly) clean slate


One great aspect of Premiere Pro's Title Designer is the ability to create your own typestyle libraries.

The issue with starting your own typestyle library is trying to clear out all the typestyles you don't want included in your new typestyle library because you end up having to delete each typestyle you don't want individually...it's sort of a tedious process.

At Style4Type, we build our own typestyle libraries of course.  However, we are too lazy to delete typestyles one-by-one.  It really cuts into the time we've allotted for watching vintage Scooby Doo cartoons and practicing clog-dancing.  Our secret weapon is this (almost) empty typestyle library that we can load through the 'replace typestyle library' command to start with a clean (or...at least spacious and tidy) slate.

If you, or someone you know is trying to create their own Premiere Pro typestyle library...you may find lots of value in having a nearly complete lack of content.  Download your empty typestyle library here.  (And fill the space with your typestyles...)

Thursday, January 23, 2014

S4T Tutorial: Neon Effect

If you've seen the video that shows off our Style4Type Premium Typestyles & Templates, you may have seen the Neon Typestyles in action.  The Title Designer doesn't animate effects like the flickering in the video, but that still doesn't mean you have to leave Premiere Pro to achieve the effect.

Wednesday, January 22, 2014

S4T Tip: Using Style4Type styles/templates with older versions of Premiere Pro

We test our typestyles and templates with Premiere Pro CS6 and CC, so we can be confident they'll work as expected in those versions of the software.

The topic of older versions of Premiere Pro has come up from time to time and our position on compatibility is this:

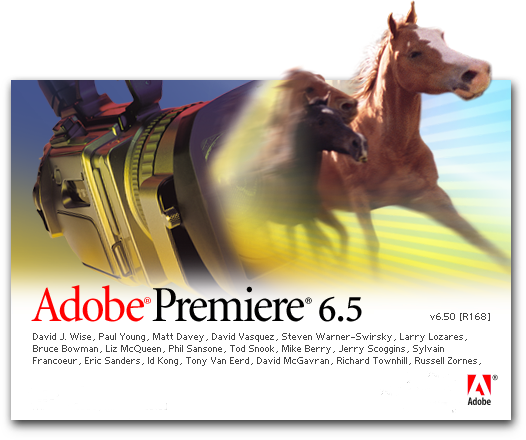
 1. The Adobe Title Designer has changed very little since Adobe Premiere (not "Pro") v6.5, when it was introduced in 2002.

2004
I wrote extensively about it in my 2004 Focal Press book on Premiere Pro (version 1.0)...and almost as extensively in the 2014 Pearson/Adobe Press book I contributed to...

2. The file extensions have remained consistent and virtually all the attributes have remained consistent since then (though we haven't gone back and checked every last item in the interface in every version for the last decade.)

3. WHILE WE CAN"T GUARANTEE FULL COMPATIBILITY WITH VERSIONS OLDER THAN CS6, we suspect our products work relatively smoothly with a considerable range of past versions of Adobe Premiere Pro.

2014
4.  If you have an older version of Premiere Pro, keep in mind that if the free S4T Base Typestyle Library works and the free templates work in your version, chances are pretty good everything up to and including our Premium Typestyle/Template product should work without issue.

*We've had user confirmation that Premiere Pro CS3 loaded and re-sized an S4T free template..

5. We urge you to do a test with our free resources before you purchase the Premium Typestyle/Template package to verify behavior in versions of Premiere Pro prior to CS6 for obvious reasons...

If you've tried to load S4T Templates or Typestyles into older versions of Premiere Pro, we'd love to hear from you about how well it worked...  style4type@gmail.com

S4T Tip: Installing Free S4T Title Templates on your system.

As our inventory of Free Premiere Pro Title Templates continues to build, we suspect that many users may want to know how to install them to make them easiest to use.

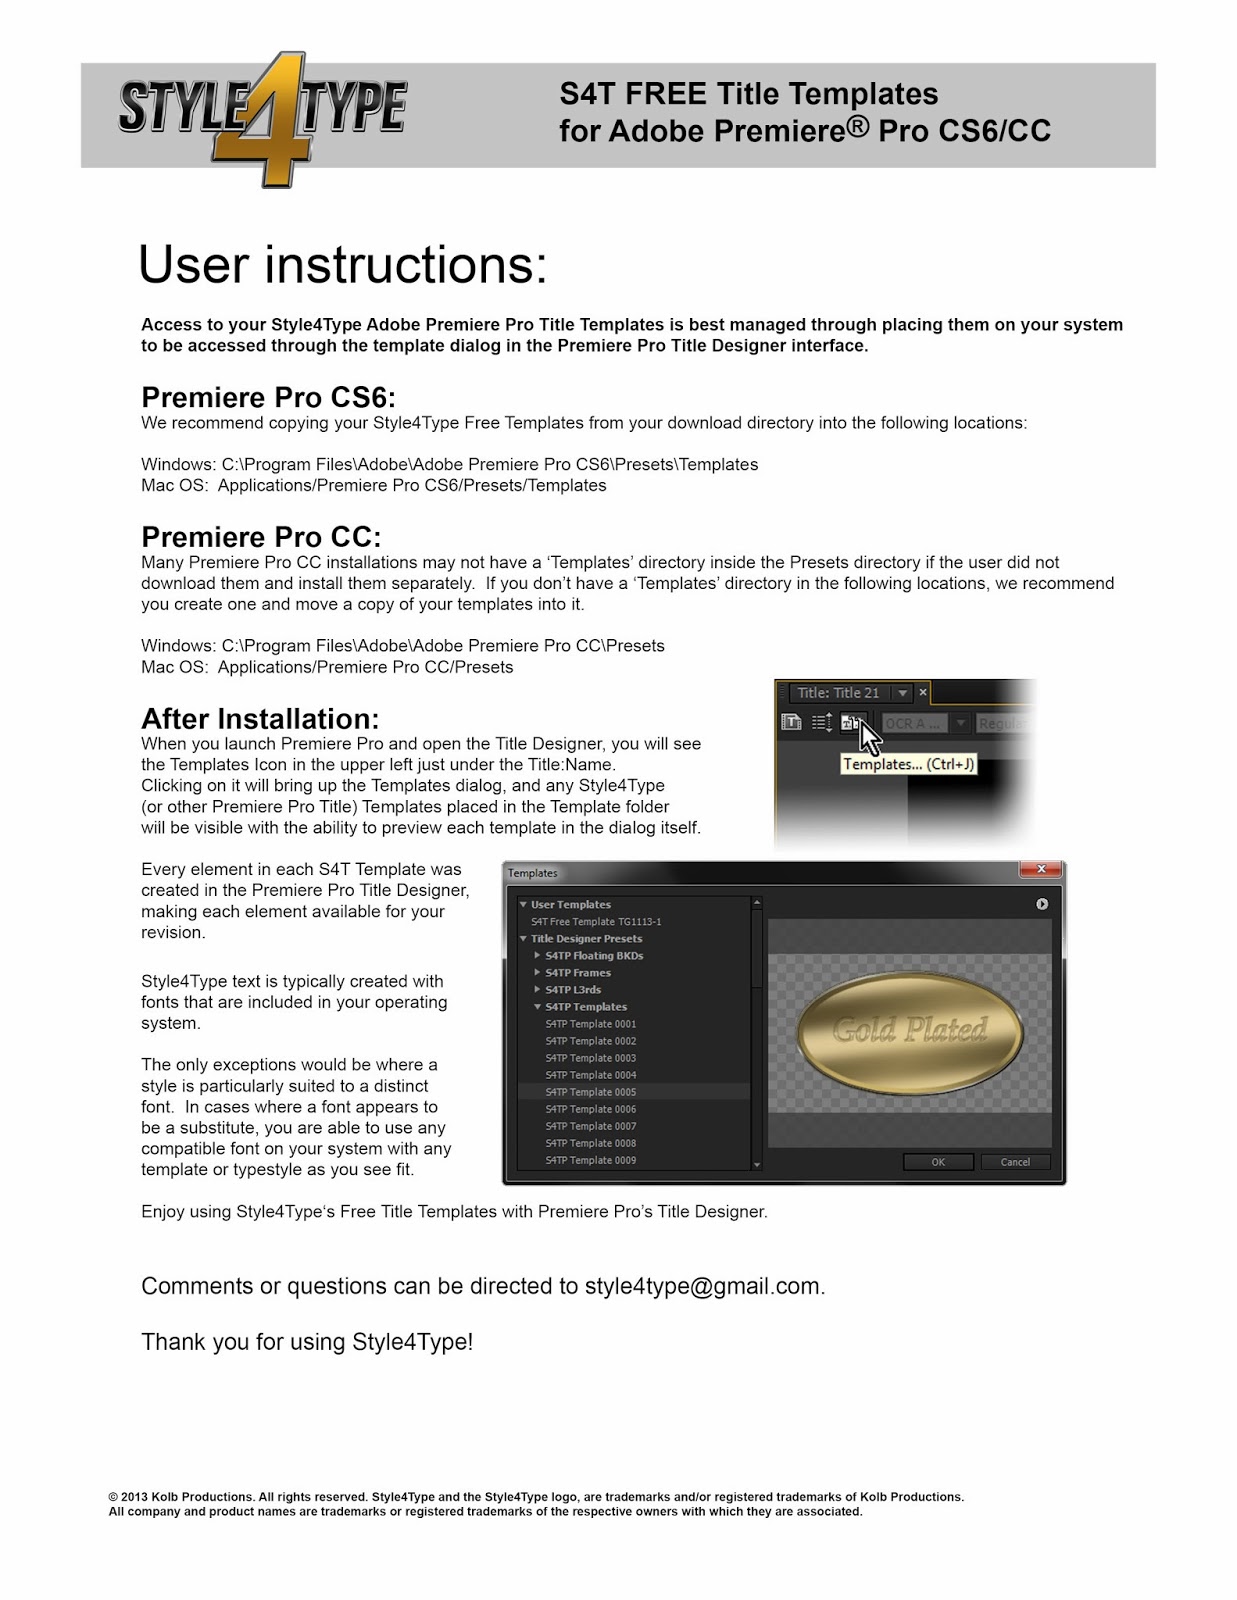
We've created a one-page PDF document that covers it for both Windows and Mac users that you can download here.

(...or you could just click on the image here to take a quick glance at the JPEG).

Friday, January 10, 2014

Information: Composite Linear Color and Premiere Pro Titles

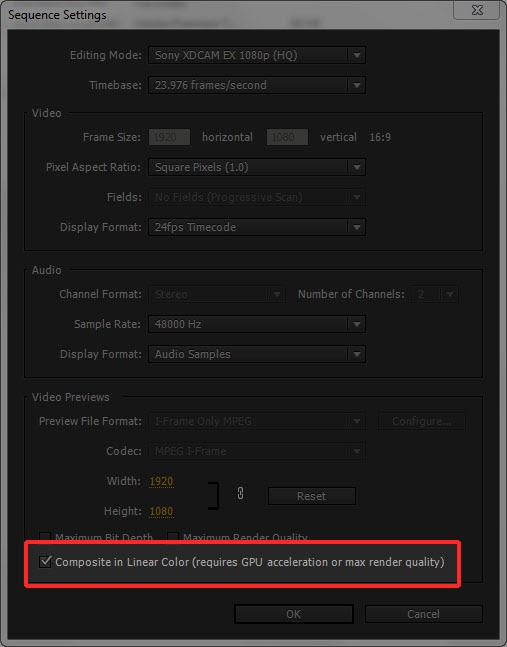
Premiere Pro added a feature that compositors applauded in version CC.  The ability to use "Linear Light" (labeled as Linear Color) calculations in compositing operations.  You can find the check box at the bottom of the Sequence Settings dialog (indicated in red as you can see if you click on the graphic at left...)

If you work with the Title Designer in Premiere Pro and set opacity levels for an object or shadows, you might find yourself wondering why the typically WYSIWYG Title Designer composition frame is considerably less so when you place your title document into an edit sequence in Premiere Pro CC.

The key to this behavior is the feature we started with...the Sequence setting that enables you to composite using Linear Color.

The graphic shows the same title (using a neon typestyle from our forthcoming Typestyle and Template Collection) in three views.

You'll see that the top version is the title shown in the Title Designer interface, and it corresponds in a very WYSIWYG-ish way to the bottom view of the title actually placed on an edit sequence in Premiere Pro CS6...or Premiere Pro CC with Color Linear unchecked.  You can see that the middle view is the odd one out.  This is the title placed in a Premiere Pro CC sequence with "Composite in Linear Color" checked.

So...if you see unexplained changes in apparent opacity behaviors on your titles between creating them and placing them into your Premiere Pro CC edit sequence, you're not crazy (at least not because of this particular situation), it's likely the apparent difference between the Titler interface which does not show opacity compositing using Linear Color calculations...and the edit sequence, which by default, does...

Of course you can always just uncheck the "Composite in Linear Color" option...and while it will change how all compositing calculations are done on the sequence in question, your title opacity will return to WYSIWYG...just sayin'.

Friday, December 6, 2013

S4T Tip: Establish Lower 3rd Style Using the Longest Name/Title

We've all been there.  The corporate video needs some serious type chops and we design a beautiful lower 3rd for use on all our interviews.  We used the company president's name in the corporate font...it's perfect.

Then...it happens.  Maybe it's a modern woman (or man) who has decided to hyphenate rather than just use the husband's family name...  Sometimes it's the over-achiever who has 10 job titles, each necessary to their identity.  Somehow, you'll end up with pain unless you develop your lower 3rd template using the longest name, and/or identifier-title to determine your layout.

It seems like a silly, minor thing until you have that documentary with 42 interviewees and the one that blows up the lower 3rd design is number 38...

Cheers.

Sunday, December 1, 2013

S4T Tip: Nothing like a 4K Title

Every so often you run into an occasion where you want a title to enter (or leave) frame by moving on the Z axis.  The best way to create this illusion in a 2D environment is to scale the title graphic up.  Of course, any time you scale any pixel-based graphic up, you'll see softness best-case...worst case it will start to look like the cubic environment of Minecraft.  Either way, it won't be good.

In Adobe Premiere Pro, your title document size is determined by the sequence that has the focus when you start to create a new title.

For this reason, I often have 4K sequences in projects where I'm editing HD 1080 or even 720p footage for HD output.  When I make a title I know I'll be zooming in on, I click into the 4K sequence before creating the new title.  The 4K title can easily be scaled down, but it also scales up and maintains its sharp edges.

*Fair warning: on a system with limited RAM or installed GPU, working with lots of 4K titles can start to bog things down, but when you need one to scale up, it's worth the hassle.